

How To Setup Artwork For Contour Cutting Of Custom Shapes
Posted Friday, June 19th • by CK • Print Specialist

Recently we were working with a customer who needed a little help setting up files for a custom shape window decal. This was a new request and design process for their designer, so we walked them through the proper method of file setup for this type of job. Ultimately, the designer learned the right way to setup artwork for this unique type of finishing and the end result was a success. Questions and discussions regarding how to setup files for contour cutting come up pretty often. I thought it would be helpful to share the experience, which prompted me to write this article. This particular job was for a number of double sided contour cut window decals. Here is a look at the actual artwork below.

The artwork above is designed for contour cutting, which simply means printing and cutting to a custom shape. This unique type of finishing is perfect for customers who need a few custom printed shapes to display their logo on a wall, at the office or trade show. Contour cut prints can be "kiss cut" so you can peel the shape off a backing liner leaving a number of peelable shapes still on the print, like a sticker. We can also "cut through" which simply means the shape is completely cut out of a board stock or adhesive material with the liner still attached. Contour cutting is generally used for single or lower quantity digitally printing orders. Much higher quantity offset printed orders require a metal die to be made for die cutting, which is an entirely different process explained below.
The Difference Between Die Cutting and Contour Cutting
When someone mentions "custom shape" in printing, it generally means dollar signs. This is because high volume traditional offset printing requires custom made metal dies. Dies are essentially metal cutting stamps that are physically made to the shape of your design. They are then used to stamp and cut out your custom designed shape from paper. Think of a custom made die used in offset printing like a metal cookie cutter which is used to cut through the paper your graphics are printed on. Keep in mind, there is often a one time but costly setup charge associated with creating the metal die being a physical process that requires a high level of craftsmanship. Depending on the complexity and shape your design requires, the custom die can cost a lot of money. While the costs may be higher than standard cut prints, it is the best way to go when printing high volume die cut shapes, custom pocket folders, specialty boxes, unique packaging, etc.
One of the reasons offset printing is so cost effective per print is because multiple items are printed on the same large sheet of paper. For example, when printing postcards; often 12 copies or more are printed on each sheet. This of course depends on the both the size of postcard being printed and sheet size of the press being used. When die cutting a custom shape from that same sheet of paper, the die is typically much smaller and able to cut only a few custom shapes with one impression.
Custom dies are generally made in smaller sizes because creating such a large die would be extremely expensive and in turn would make the overall job cost prohibitive. To keep die creation costs down, your printer must then cut using a smaller sized die, which means extra time is needed for production. To put this in perspective, you would need 16 custom shapes printed on each sheet of paper with a total of 500 printed sheets for larger 8000qty quantity order. Each sheet of paper would need to be further cut down to accommodate however many shapes the die is setup for; which is often just 2 to 6 custom shapes depending on the size and shape of your design.
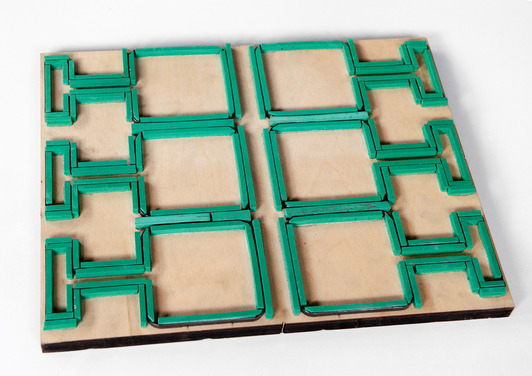
The image above is an example of a metal die used in offset printing. The green bumpers that surround the metal provide cushioning when the die makes an impression on the paper. As you can see, this work requires time consuming labor and a high level of trade expertise to produce.
Computer Controlled Contour Cutting Requires No Die
For large format digital printing we use a finishing device called a flat bed cutting plotter; sometimes referred to as a router having the ability to cut thick board stocks, acrylic and plastics. This is a digitally controlled cutting system where interchangeable cutting tools hover above the substrate and makes a series of computer controlled cuts directly to the print. The cutting tool is aligned using a separate cutting file and registration dots / marks that are printed on the material or board stock to act as a guide. No metal dies are needed, but proper file setup is important because you will need to setup the registration marks and cutting file necessary for contour cutting.
The video below is a demonstration of the Zund G3 digital cutting system in action. The material being contour cut in the video is textile fabric used to create wind banner flags. Take note of how the registration dots / marks are equally spaced throughout the design, more on that below.
Contour Cutting Requires 2 Files: The Artwork and The Cutting File
Below is a snapshot of the artwork being setup for contour cutting. In the actual design, there were many more stickers setup on the sheet, 88 stickers on one 48 x 48" print to be exact. Notice how the small black dots have been added to the design within the non printed areas and are evenly spaced to help guide the cutting tool. These registration marks should be added to your design so the cutting plotter can accurately cut the prints out of the stock or board. Some printing companies require different size registration dots / marks. We need at least 1/8th inch diameter dots, but it's generally best to use 1/4" registration dots / marks for this purpose. Going with 1/4" dots will ensure maximum compatibility with equipment most printers use.

The next image below is of the cutting file which outlines the shape that is meant to be cut out of the stock or board. This file is very important because it is what allows the cutting tool to make accurate guided cuts within or around the printed design. The beauty of this system is that the cutting tool follows a digital file and also uses the printed registration marks to stay aligned and cut properly during the cutting process.
If you were to overlay the cutting file on top of one of the shapes used in this example, it would look like the mock-up pic below. Take note of how the cutting file line lies within the printed area; the extra area outside the cutting line is the bleed area. When cutting is complete, the decal can be easily removed with clean cut border-less contours on all sides.

The artwork within this article has large number of registration dots / marks only because the repeating decals are so tightly spaced together on a single sheet. It is a good idea to check with your printer and ask how the registration dots / marks should be setup and spaced within your particular design.
Custom Printed Shapes Are Cost Effective & File Setup Is Simple
Most large format contour cut orders are setup for one or two large shapes per print and not 88 individual decals as in the example above. Still, it is important to note the production process and finishing costs are the same. A large shape such as a logo or an image can be easily cut from a number of different types of paper, self adhesive stocks or boards to achieve the result you are looking for. However, it really doesn't matter or cost more from a production standpoint if you have only 1 large shape or a large number of shapes to be cut from the same material. Once the cutting process is setup and starts, it is 100% automated.
What is important, is that you setup the artwork, registration marks and cutting file so they all align perfectly. An easy way to do this using Adobe illustrator; is to design your artwork, then setup up an 2nd artboard and layer to overlay your cutting file outline as in the illustration above. Just remember to save everything as 2 separate files; one for artwork and the other for cutting.
Let's Sum It All Up - 4 Points To Remember
- Be sure to include at least 1/8th inch or at best 1/4 inch registration dots / marks equally spaced throughout your design and positioned around the intended area that will be contour cut.
- Contour cutting requires 2 files; the artwork file and the cutting file. Once you are done designing your artwork and have added the registration dots / marks; create a 2nd artboard and layer for the cutting file so you can easily overlay the cutting file outlines over the artwork file. Doing this will allow you to see how the cutting file interacts with the artwork and will give you the best possible representation of the finished product.
- Save each file as a high quality PDF and be sure to first convert all text with your design to outlines so there are no missing font issues during production.
- Relax. This is simple to setup and produce but we are here to help if you need assistance.
"Kiss Cut" and "Cut Through" Contour Cutting
Lastly, there are two popular methods of contour cutting than can be achieved depending on the type of material you are printing on. The first and most common is "cut through" contour cutting. This is as simple as it sounds, where the cutting tool cuts entirely through the material or board leaving a custom cut shape. This type of cutting is often requested for large cut outs of a person, logo or shape on board stock which will be displayed on some sort of stand or will be mounted on a wall.
The second method of contour cutting is called "kiss cut". Computer controlled cutting has the ability to control the depth of each cut. This capability is perfect for kiss cutting custom shapes on adhesive materials. This is how you are able to peel off just one shape from the uncut liner, leaving the remaining decals on the sheet for later use.
Products Perfectly Suited For Contour Cutting
The most popular types of products we offer that are perfect for contour cutting or require contour cutting to produce can be found below.
- Poster Boards
- Self Adhesive Removable Vinyl
- Sintra / PVC Boards
- Window Clings
- Wall & Door Fabric
- Wind Banner Flags
When you are planning to setup and print contour cut graphics, we offer free artwork review. Should you have any questions regarding file setup, feel free to contact us through our website or live chat with one of our printing specialists. If you prefer to discuss your next printing project over the phone, simply give us a call at (516) 922-0692 for assistance.
|
Stay Informed & Save On Printing @ImageKrafters
Joining our mailing also makes you eligible to receive online printing promo codes and specials we occasionally offer to our customers and followers. It is our promise never to sell or misuse your info. We despise spam like everyone else! |

