Understanding Printing Bleeds & Why It's So Important
Posted Wednesday, November 28th • by CK • Print Specialist

Adding a bleed to artwork you are planning to print is simple. Whether you are designing files yourself or having a graphic designer prepare your artwork; the setup is easy to do and understand. In the article below, we will explain how adding a printing bleed to your artwork will save time, expense and headaches when deadlines need to be met. A printing bleed is very simply a larger area of the background image in your design that can be cut off without affecting the overall design when printed.
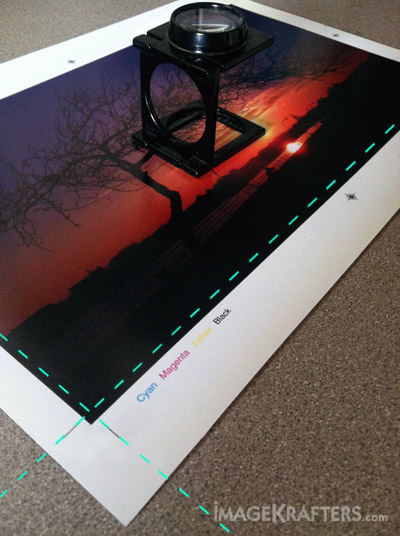
Take a look at the example below. This print was mounted to foamcore and then cut leaving a clean image from end to end of the finished print. The designer who setup the file included a quarter inch of bleed area as illustrated in the crop marks that specify where the print should be cut to the intended dimensions. The crop marks in the image below that have been accentuated by cyan blue dashes and specifically indicate where to cut off the extra bleed area to allow for a clean borderless edge, more on that below.

Add A Quarter Inch (.25") To Finished Size For Printing Bleed
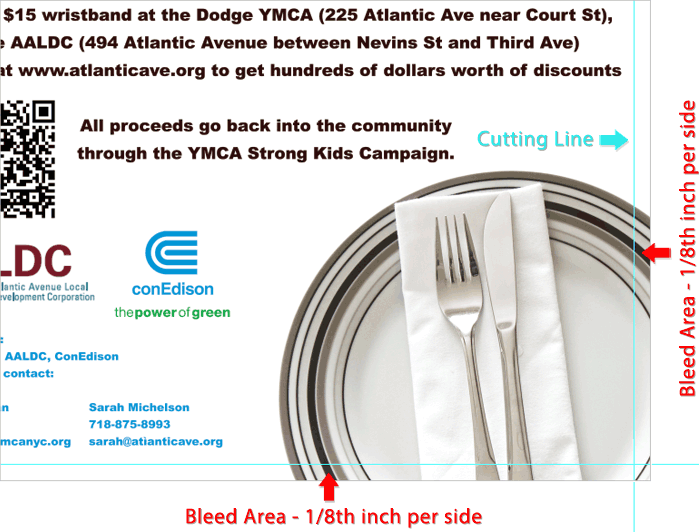
Even using the most accurate laser guided commercial paper cutters, it is impossible to cut your prints exactly to the finished size you need without including an extra "bleed" area. Most professional printing companies will ask you include 1/4 inch (0.25") bleed area in your artwork for proper cutting. The image below is from the bottom corner of a poster print where the designer included bleed area. The finished print size was intended to be 11 x 17" and the file that was sent was setup 11.25 x 17.25 which included the quarter inch total bleed area for cutting.

If you do not include this extra bleed in your files, your printer may need to "short trim" your print to make a deadline if absolutely necessary. Doing so could leave you with a finished product that either has text printed too close to the edge of the print or important images and text that has been cut off entirely. Even If you are fortunate enough to have time to fix the file by adding bleed area; print production time will likely be lost and rush charges and/or overnight shipping services may be needed to deliver your order on time. Setting up crops and bleeds in your artwork is just a good idea and will certainly save you time and headaches.
Points of Interest:
- Add 1/4" overall printing bleed area to your files to allow for proper cutting if your artwork extends to the edge of your intended finished print size.
- The bleed area will extend past the intended final print size and will be cut off. Common print sizes along with the corresponding sizes with print bleed included are below.
- 8.5 x 11" Printed Size • Artwork Size Including Bleed = 8.75" x 11.25"
- 11 x 14" Printed Size • Artwork Size Including Bleed = 11.25 x 14.25"
- 11 x 17" Printed Size • Artwork Size Including Bleed = 11.25 x 17.25"
- 18 x 24" Printed Size • Artwork Size Including Bleed = 18.25 x 24.25"
- 24 x 36" Printed Size • Artwork Size Including Bleed = 24.25 x 36.25"
An expanded and detailed article to explain specifically how to add crop and bleeds using the most popular design software will be posted soon. If you have any questions regarding setup of print bleed or general artwork concerns, please contact us with questions or call us at (516) 922-0692.
|
Stay Informed & Save On Printing @ImageKrafters
Joining our mailing also makes you eligible to receive online printing promo codes and specials we occasionally offer to our customers and followers. It is our promise never to sell or misuse your info. We despise spam like everyone else! |


